Dienstag, 31. März 2015

HOWTO: Moving Raspberry Pi 2 filesystem to a USB.stick or USB.harddisk


by paulv » Sat May 18, 2013 1:26 pm
I use one of my Pi's (Pies?) in a more or less Mission Critical Application on another continent, and was getting concerned with the reports about SD cards getting corrupted. Apparently, these cards are not really made for heavy read/write applications, although nice and cheap in educational and hobby environments.

If you want to offload the main filesystem to another medium, there are several examples if you Google around enough. Unfortunately, some are not really applicable to the Raspberry Pi, others are for super-super users, who know what they are doing.

I created this description to make it also usable for power-users, although I am by no means a super-power-user myself. Beware! :roll:

To make it simple and easier, I created two parts to the procedure.
1. For the simple use of the Pi with only 1 extra USB drive or stick
2. An extended version if you need more than one drive attached to your Pi. (Raspbmc users?) Note that this version is a little more complicated.

We will start off with a brand new SD card, and a brand new USB stick.
The size and speed of the SD card is no longer important and any card over 2G will do. (it has to be 2G because we're going to load complete Debian on it)
The size of the USB drive/stick depends on your application, anything over 2G will do. Speed matters a bit more here, but I'm not going for a speed improvement, that's another topic.

In this description I will use a micro SDHC memory card with 4GM, class 10, because I use the cards for other applications as well and I don't like the SD card sticking outside of the Pi cover (already broken one SD card adapter). And I also use a micro USB stick with a size of 8GB.

First of all, you need to load the Wheezy Raspbian image (I used 2013-02-09) on the SD card. There are enough procedures to tell you how to do that. I use win32diskimager on my W7 laptop.
Once that is done, you can put it in your Pi and boot it up.
If you use a LAN cable, you're good to go. If you run a headless Pi (like I do) over WIFI, you need to configure that first, again, there are many procedures on how to do that for your particular dongle. I use an EDIMAX in this particular setup. Obviously, I'm using ssh, but that does not matter.


First of all, you should run raspi-config and setup ONLY the following:
Code: Select all
sudo raspi-config

configure_keyboard (not needed for a headless Pi)
change_pass (change the raspberry password if you wish at this moment, can also be done later)
change_locale
change_timezone
memory_split (a headless can be set to 16MB)
Do not update/upgrade at this moment! That will cause a lot of thrashing on the SD card, which is what we want to avoid.

After a reboot to load the new parameters, we're good to go.

Check the filesystem:
Code: Select all
pi@raspberrypi ~ $ df -h
Filesystem      Size  Used Avail Use% Mounted on
rootfs          1.8G  1.4G  247M  86% /
/dev/root       1.8G  1.4G  247M  86% /
devtmpfs        235M     0  235M   0% /dev
tmpfs            49M  248K   49M   1% /run
tmpfs           5.0M     0  5.0M   0% /run/lock
tmpfs            98M     0   98M   0% /run/shm
/dev/mmcblk0p1   56M   19M   38M  34% /boot
pi@raspberrypi ~ $
Notice that although I use an 8GB SD card, the default is 1.8G in size, because we did not use expand_rootfs.
The entry /dev/mmcblk0p1 is the boot partition (p1) on device mmcblk0, the SD card.

The boot partition will be the only piece on the SD card used when we're done, and that is because of the particular way the Pi goes through the boot process. It actually starts with the graphics chip loading this data first, and it then releases the reset pin of the CPU which continues and takes over.

Now plug in your USB drive/stick if you have not done that yet (I'll refer to stick from now on)

Check to see if it's recognized:
Code: Select all
pi@raspberrypi ~ $ lsusb
Bus 001 Device 002: ID 0424:9512 Standard Microsystems Corp.
Bus 001 Device 001: ID 1d6b:0002 Linux Foundation 2.0 root hub
Bus 001 Device 003: ID 0424:ec00 Standard Microsystems Corp.
Bus 001 Device 004: ID 7392:7811 Edimax Technology Co., Ltd EW-7811Un 802.11n Wireless Adapter [Realtek RTL8188CUS]
Bus 001 Device 006: ID 8644:800b
pi@raspberrypi ~ $
Device 006 is the USB adapter. The ID shows a unique manufacturer identifier.
Also check to see if the OS recognized the device: (you can also use the command dmesg)
Code: Select all
pi@raspberrypi ~ $ tail /var/log/messages
May 18 11:44:31 raspberrypi kernel: [   64.093866] usb 1-1.3: New USB device strings: Mfr=1, Product=2, SerialNumber=3
May 18 11:44:31 raspberrypi kernel: [   64.093883] usb 1-1.3: Product: Intenso Micro Line
May 18 11:44:31 raspberrypi kernel: [   64.093898] usb 1-1.3: Manufacturer: Intenso
May 18 11:44:31 raspberrypi kernel: [   64.093912] usb 1-1.3: SerialNumber: 12390000000004E2
May 18 11:44:31 raspberrypi kernel: [   64.112228] scsi1 : usb-storage 1-1.3:1.0
May 18 11:44:32 raspberrypi kernel: [   65.113335] scsi 1:0:0:0: Direct-Access     Intenso  Micro Line       1.01 PQ: 0 ANSI: 2
May 18 11:44:32 raspberrypi kernel: [   65.114862] sd 1:0:0:0: [sda] 15669248 512-byte logical blocks: (8.02 GB/7.47 GiB)
May 18 11:44:32 raspberrypi kernel: [   65.115607] sd 1:0:0:0: [sda] Write Protect is off
May 18 11:44:32 raspberrypi kernel: [   65.126062]  sda: sda1
May 18 11:44:32 raspberrypi kernel: [   65.129907] sd 1:0:0:0: [sda] Attached SCSI removable disk
pi@raspberrypi ~ $
Yep, the USB stick can be referenced as /dev/sda

There is no way of knowing what name the OS assigns to additional USB drives, if that's what you want to do, you need to follow the extended version of the procedure down below.

If one USB memory stick is what you're going to use, start here:

Create a filesystem on the USB stick, use "p" to list the partitions
Code: Select all
pi@raspberrypi ~ $ sudo fdisk /dev/sda

Command (m for help): p

Disk /dev/sda: 8022 MB, 8022654976 bytes
94 heads, 14 sectors/track, 11906 cylinders, total 15669248 sectors
Units = sectors of 1 * 512 = 512 bytes
Sector size (logical/physical): 512 bytes / 512 bytes
I/O size (minimum/optimal): 512 bytes / 512 bytes
Disk identifier: 0x00000000

   Device Boot      Start         End      Blocks   Id  System
/dev/sda1              32    15669247     7834608    b  W95 FAT32

Command (m for help):
There is a partition, formatted for Windows. We need to reformat the drive for Linux.
Enter d to delete partion(s).
Note
If you are going to use the stick only for the Debian filesystem, go on. If you have a large stick or a USB drive, you may want to consider making one partition for Debian, and other ones for whatever you like. This is beyond the scope of this article, but I'm sure you can figure it out.
We will continue with the simple solution, one partition.

Enter n to create a new primary partition ( number 1) and use the full capacity by hitting return a few times until done:

Code: Select all
Command (m for help): d
Selected partition 1

Command (m for help): n
Partition type:
   p   primary (0 primary, 0 extended, 4 free)
   e   extended
Select (default p): p
Partition number (1-4, default 1): 1
First sector (2048-15669247, default 2048):
Using default value 2048
Last sector, +sectors or +size{K,M,G} (2048-15669247, default 15669247):
Using default value 15669247

Command (m for help):
Now write the new information to the stick by entering "w":

Code: Select all
Command (m for help): w
The partition table has been altered!

Calling ioctl() to re-read partition table.
Syncing disks.
pi@raspberrypi ~ $
Done, so now we can format the partition:
Code: Select all
pi@raspberrypi ~ $ sudo mke2fs -t ext4 -L rootfs /dev/sda1
mke2fs 1.42.5 (29-Jul-2012)
Filesystem label=rootfs
OS type: Linux
Block size=4096 (log=2)
Fragment size=4096 (log=2)
Stride=0 blocks, Stripe width=0 blocks
490560 inodes, 1958652 blocks
97932 blocks (5.00%) reserved for the super user
First data block=0
Maximum filesystem blocks=2009071616
60 block groups
32768 blocks per group, 32768 fragments per group
8176 inodes per group
Superblock backups stored on blocks:
        32768, 98304, 163840, 229376, 294912, 819200, 884736, 1605632

Allocating group tables: done
Writing inode tables: done
Creating journal (32768 blocks): done
Writing superblocks and filesystem accounting information: done

pi@raspberrypi ~ $
And we need to mount the partition to start using it:
Code: Select all
pi@raspberrypi ~ $ sudo mount /dev/sda1 /mnt
pi@raspberrypi ~ $
Let's see what we've done so far:
Code: Select all
pi@raspberrypi ~ $ df -h
Filesystem      Size  Used Avail Use% Mounted on
rootfs          1.8G  1.4G  247M  86% /
/dev/root       1.8G  1.4G  247M  86% /
devtmpfs        235M     0  235M   0% /dev
tmpfs            49M  248K   49M   1% /run
tmpfs           5.0M     0  5.0M   0% /run/lock
tmpfs            98M     0   98M   0% /run/shm
/dev/mmcblk0p1   56M   19M   38M  34% /boot
/dev/sda1       7.4G  145M  6.9G   3% /mnt
pi@raspberrypi ~ $
We made the stick /dev/sda1 available as /mnt for Linux, so now we can start to use it.

We can copy (mirror) the data in /dev/root to the new drive.
We can use dd, but that is a bit copy program and because it also copies the empty space on the SD card, it is very, very slow.
Better is to use rsync.
Install that first:
Code: Select all
pi@raspberrypi ~ $ sudo apt-get install rsync
...
pi@raspberrypi ~ $
And run it. Although much faster, it will still take some time to create a mirror image of the file system on the USB drive. We will copy everything from "/" to the just mounted drive /mnt (which is /dev/sda1)

Code: Select all
pi@raspberrypi ~ $ sudo rsync -axv / /mnt
...
On my system it took about 15 minutes. Make sure this process does not get interrupted!
If you want, you can open another ssh session and continue with the process, so you don't have to wait for the rsync process to complete.

We're going to tell the Pi where to find the new data when it boots Debian.
The file we need to change is /boot/cmdline.txt
Before we're going to do that, we're going to create a backup copy so we can change things back if there is a problem. Be careful, if you mess up this file, you will almost certainly stop the Pi from booting, and you may have to start all over again by reloading the image.

Code: Select all
sudo cp /boot/cmdline.txt /boot/cmdline.orig

The contends of this file is one very long command string, and we need to replace the reference to the partition on the SD card (root=/dev/mmcblk0p2) to the new USB stick (root=/dev/sda1)
Here is a copy of the original file:
Code: Select all
pi@raspberrypi ~ $ cat /boot/cmdline.txt
dwc_otg.lpm_enable=0 console=ttyAMA0,115200 kgdboc=ttyAMA0,115200 console=tty1 root=/dev/mmcblk0p2 rootfstype=ext4 elevator=deadline rootwait
pi@raspberrypi ~ $
To be on the safe side, there is one more command we should add. During the power-up/boot sequence, it may take the USB stick a little longer to be ready, than the OS expects. If we add a delay of 5 seconds (rootdelay=5), the USB stick will be ready when it's needed. You may not need it, or a smaller amount, so go figure it out. When my remote system has to reboot, I want it to be safe, a few seconds more is not an issue.

Use your favorite editor to add these two changes like so:
Code: Select all
sudo nano /boot/cmdline.txt

It should look like this:
Code: Select all
pi@raspberrypi ~ $ cat /boot/cmdline.txt
dwc_otg.lpm_enable=0 console=ttyAMA0,115200 kgdboc=ttyAMA0,115200 console=tty1 root=/dev/sda1 rootfstype=ext4 elevator=deadline rootwait rootdelay=5
pi@raspberrypi ~ $

Next we need to enter a few things into the filesystem table, /etc/fstab. (on the stick, not the SD card)
Code: Select all
sudo nano /mnt/etc/fstab
Add the following line :
Code: Select all
/dev/sda1    /   ext4    defaults,noatime  0       1
And put a comment in front of the reference to the SD card:
Code: Select all
#/dev/mmcblk0p2  /               ext4    defaults,noatime       0       1

It should now look like this:
Code: Select all
proc            /proc           proc    defaults          0       0
/dev/sda1       /               ext4    defaults,noatime  0       1
/dev/mmcblk0p1  /boot           vfat    defaults          0       2
#/dev/mmcblk0p2  /               ext4    defaults,noatime  0       1
# a swapfile is not a swap partition, so no using swapon|off from here on, use  dphys-swapfile swap[on|off]  for that

This is it for the simple version. you can now reboot the system:
Code: Select all
sudo reboot
Note that you will not see much activity on the ACT LED anymore. This LED only shows R/W activity on the SD card.
After the Pi has booted, check the filesystem:
Code: Select all
pi@raspberrypi ~ $ df -h
Filesystem      Size  Used Avail Use% Mounted on
rootfs          7.4G  1.6G  5.5G  22% /
/dev/root       7.4G  1.6G  5.5G  22% /
devtmpfs        235M     0  235M   0% /dev
tmpfs            49M  248K   49M   1% /run
tmpfs           5.0M     0  5.0M   0% /run/lock
tmpfs            98M     0   98M   0% /run/shm
/dev/mmcblk0p1   56M   19M   38M  34% /boot
pi@raspberrypi ~ $
The rootfs is now on the stick, notice the size of 7.5G

Changing the swap file size
There is no need to mess with swap partitions on the Pi, this is implemented differently from other Linux systems. Raspbian uses dphys-swapfile, which is a swap-file based solution instead of the "standard" swap-partition solution. It is also much easier to change the size of the swap.

If you need to change the swap file size, proceed as follows:

Look at the swap data first by using the top command:
Code: Select all
pi@raspberrypi ~ $ top
top - 13:28:20 up 3 min,  1 user,  load average: 0.18, 0.37, 0.18
Tasks:  66 total,   1 running,  65 sleeping,   0 stopped,   0 zombie
%Cpu(s):  1.0 us,  0.0 sy,  0.0 ni, 98.7 id,  0.0 wa,  0.0 hi,  0.3 si,  0.0 st
KiB Mem:    497544 total,    55700 used,   441844 free,     5432 buffers
KiB Swap:   102396 total,        0 used,   102396 free,    27592 cached

102396 is 100MB of swap space

The configuration file for the swap space is: /etc/dphys-swapfile

The content is very simple. By default Raspbian has 100MB of swap space:
Code: Select all
pi@raspberrypi ~ $ cat /etc/dphys-swapfile
CONF_SWAPSIZE=100
pi@raspberrypi ~ $
If you want to change the size, you need to modify the number and then resize and restart the dphys-swapfile:

Code: Select all
pi@raspberrypi ~ $ sudo nano /etc/dphys-swapfile
pi@raspberrypi ~ $
I changed the size from 100 MB to 512MB, the full amount of RAM.
After the parameter in the file has been changed run:
Code: Select all
pi@raspberrypi ~ $ sudo dphys-swapfile setup
want /var/swap=512MByte, checking existing: deleting wrong size file (104857600), generating  swapfile ... of 512MBytes
pi@raspberrypi ~ $
To load the new size, we need to stop the swapfile process:
Code: Select all
pi@raspberrypi ~ $ sudo /etc/init.d/dphys-swapfile stop
Stopping dphys-swapfile swapfile setup ..., done.
pi@raspberrypi ~ $
And restart it:
Code: Select all
pi@raspberrypi ~ $ sudo /etc/init.d/dphys-swapfile start
Starting dphys-swapfile swapfile setup ...
want /var/swap=512MByte, checking existing: keeping it
done.
pi@raspberrypi ~ $
And now we can check it again with top:
Code: Select all
top - 13:37:22 up 12 min,  1 user,  load average: 0.01, 0.08, 0.12
Tasks:  64 total,   1 running,  63 sleeping,   0 stopped,   0 zombie
%Cpu(s):  0.7 us,  0.3 sy,  0.0 ni, 99.0 id,  0.0 wa,  0.0 hi,  0.0 si,  0.0 st
KiB Mem:    497544 total,    57016 used,   440528 free,     5556 buffers
KiB Swap:   524284 total,        0 used,   524284 free,    28604 cached
Done!
Now that you have everything running on the USB stick, it's time to update and upgrade Debian:
Code: Select all
sudo apt-get update
sudo apt-get upgrade -y
sudo apt-get autoremove
And off you go...

Changing the process back to the SD card
If you ever run into problems booting from the USB stick, you can try to move the original /boot/cmdline.txt back by putting the SD card back into your PC, and use the Filemanager to copy the file /boot/cmdline.txt to something else (/boot/cmdline.usb) and copy the name of /boot/cmdline.orig to /boot/cmdline.txt. (watch out: do not use rename, because Windows may rename the file called cmdline.txt to cmdline.txt.txt !)
If your system still works with the USB stick, you can also mount the windows partition on the SD card and make the changes to the cmdline files from within Debian.

Before you do that however, remember that we modified the /etc/fstab file on the SD card and then moved it to the USB stick. We need to change the contends back on the SD card to the original settings before we can easily change the filesystem back to the SD card.
If you followed the procedure above, do the following:
Code: Select all
pi@raspberrypi ~ $ df -h
Filesystem      Size  Used Avail Use% Mounted on
rootfs          7.4G  2.5G  4.6G  36% /
/dev/root       7.4G  2.5G  4.6G  36% /
devtmpfs        235M     0  235M   0% /dev
tmpfs            49M  240K   49M   1% /run
tmpfs           5.0M     0  5.0M   0% /run/lock
tmpfs            98M     0   98M   0% /run/shm
/dev/mmcblk0p1   56M   19M   38M  33% /boot
Use the device name without the partition (p1)
Code: Select all
pi@raspberrypi ~ $ sudo fdisk /dev/mmcblk0

Command (m for help): p

Disk /dev/mmcblk0: 4035 MB, 4035969024 bytes
4 heads, 16 sectors/track, 123168 cylinders, total 7882752 sectors
Units = sectors of 1 * 512 = 512 bytes
Sector size (logical/physical): 512 bytes / 512 bytes
I/O size (minimum/optimal): 512 bytes / 512 bytes
Disk identifier: 0x00014d34

        Device Boot      Start         End      Blocks   Id  System
/dev/mmcblk0p1            8192      122879       57344    c  W95 FAT32 (LBA)
/dev/mmcblk0p2          122880     7882751     3879936   83  Linux

Command (m for help): q
So now that we know what the Linux file system partition is (p2), we can mount it.
Code: Select all
pi@raspberrypi ~ $ sudo mount /dev/mmcblk0p2 /mnt
And check it
Code: Select all
pi@raspberrypi ~ $ df -h
Filesystem      Size  Used Avail Use% Mounted on
rootfs          7.4G  2.5G  4.6G  36% /
/dev/root       7.4G  2.5G  4.6G  36% /
devtmpfs        235M     0  235M   0% /dev
tmpfs            49M  240K   49M   1% /run
tmpfs           5.0M     0  5.0M   0% /run/lock
tmpfs            98M     0   98M   0% /run/shm
/dev/mmcblk0p1   56M   19M   38M  33% /boot
/dev/mmcblk0p2  3.7G  1.7G  1.9G  47% /mnt
OK, now we can edit the fstab file on the SD card so it looks like the original version again.
Code: Select all
pi@raspberrypi ~ $ sudo nano /mnt/etc/fstab
And check it.
Code: Select all
pi@raspberrypi ~ $ sudo cat /mnt/etc/fstab
proc            /proc           proc    defaults          0       0
/dev/mmcblk0p1  /boot           vfat    defaults          0       2
/dev/mmcblk0p2  /               ext4    defaults,noatime  0       1
# a swapfile is not a swap partition, so no using swapon|off from here on, use  dphys-swapfile swap[on|off]  for that
#filesystem on USB stick

pi@raspberrypi ~ $

With a bit of luck, by just doing a copy of the right /boot/cmdline version on the Windows partition of the SD card, you will be able to change the booting process from the SD card. If not, there is enough information in this procedure to help you out I hope. ;)


Extended procedure:

Because we must force Debian to boot from the right USB device, we need to assign unique identifiers for the partition and the filesystem, rather than the names the system gives to the USB devices, like /dev/sda.

I'm assuming that after reading the above, we can be a little more terse.
Instead of using the standard fdisk command, we will use the more modern version gdisk.
We can install gdisk with:
Code: Select all
sudo apt-get install gdisk

We start the partitioning with:
Code: Select all
sudo gdisk /dev/sda

And we actually use the same sequence as with fdisk. First "d" for delete, then "n" for new and "w" to write it all out. Again use the defaults by hitting return. If you want more partitions, now is the time.

When you use the "i" command (information), you can see the following details:
Code: Select all
pi@raspberrypi ~ $ sudo gdisk /dev/sda
GPT fdisk (gdisk) version 0.8.5

Partition table scan:
  MBR: protective
  BSD: not present
  APM: not present
  GPT: present

Found valid GPT with protective MBR; using GPT.

Command (? for help): i
Using 1
Partition GUID code: 0FC63DAF-8483-4772-8E79-3D69D8477DE4 (Linux filesystem)
Partition unique GUID: 2C7FD5E5-5CC4-434C-BFF6-F45336F7140B
First sector: 2048 (at 1024.0 KiB)
Last sector: 15669214 (at 7.5 GiB)
Partition size: 15667167 sectors (7.5 GiB)
Attribute flags: 0000000000000000
Partition name: 'Linux filesystem'

Command (? for help):
And this is what we need: Partition unique GUID: 2C7FD5E5-5CC4-434C-BFF6-F45336F7140B
This information (PARTUUID) goes into the /boot/cmdline.txt like so:
Code: Select all
pi@raspberrypi ~ $ cat /boot/cmdline.txt
dwc_otg.lpm_enable=0 console=ttyAMA0,115200 kgdboc=ttyAMA0,115200 console=tty1 root=PARTUUID=2C7FD5E5-5CC4-434C-BFF6-F45336F7140B rootfstype=ext4 elevator=deadline rootwait rootdelay=5
pi@raspberrypi ~ $
Don't forget to add the rootdelay!

We now continue with formatting, mounting, installing rsync and the mirroring:
Code: Select all
sudo mke2fs -t ext4 -L rootfs /dev/sda1
sudo mount /dev/sda1 /mnt
sudo apt-get install rsync
sudo rsync -axv / /mnt
Now we need to get a unique identifier for the fstab drive information:

Code: Select all
pi@raspberrypi ~ $ sudo tune2fs -l /dev/sda1
tune2fs 1.42.5 (29-Jul-2012)
Filesystem volume name:   rootfs
Last mounted on:          /
Filesystem UUID:          3d2cb3c9-7e2b-4255-ac63-863bd3ad7993
Filesystem magic number:  0xEF53
Filesystem revision #:    1 (dynamic)
...
pi@raspberrypi ~ $
And this is what we need: Filesystem UUID: 3d2cb3c9-7e2b-4255-ac63-863bd3ad7993

Next we can enter the information into the filesystem table, /etc/fstab (on the stick, not the SD card). Add the following line:
Code: Select all
/dev/disk/by-uuid/3d2cb3c9-7e2b-4255-ac63-863bd3ad7993    /   ext4    defaults,noatime  0       1

And put a comment in front of the reference on the SD card:
Code: Select all
#/dev/mmcblk0p2  /               ext4    defaults,noatime       0       1

And that's it. If you are done checking everything (don't mix up the partition GUID and the filesystem UUID!!!) , you can reboot now and check if all is well.

Have fun! :)

[edit] I have made the changes based on the input from violagirl23 on sept-26-2013. Thank you girl!
Last edited by paulv on Fri Sep 27, 2013 11:29 am, edited 12 times in total.

Sonntag, 29. März 2015

pimail perspectives: step-by-step

Starting with e-mail, then pdf attachments, then mp3 & personal voice-messages (mono, 44 kbit/sec).

pimail.project: challenges

oh yes. there more diggin in net, the more challenges...

so: main problem is sustainable power supply, we cannot imagine in europe, in 220V there are pikes of 1000 Volts. This will destroy everything.

So only buffered solar power will be an adequate solution. 12 V, PC and screen!

Also SDCard is destroyed after 6-8 month of 24/365 working. Therefore all data and operations will be performed from external usb harddisk. I decided: 500 Gigabyte. SATA in an external casing. berryboot will help perfect!

Next challenge will be: starting Raspberry Pi ,  because of energetic aspects, this gadget will be ideal. But not operating from SD-card.

i continue digging now

air jaldi / wikipedia

AirJaldi, a social enterprise based in India, is a leading innovator and implementer[1] of technically and economically viable Internet connectivity solutions for rural areas.[2] AirJaldi operates two closely related organizations: Rural Broadband Pvt. Ltd., dedicated to designing, building and operating networks, and AirJaldi Research & Innovation, which focuses on R&D, training and capacity-building:
Rural Broadband Pvt. Ltd. uses the brand name AirJaldi networks. It was incorporated in India in 2009 with the aim of creating sustainable broadband Internet networks and solutions for rural areas. AirJaldi Networks’ activities are carried out from its management office in Delhi, the main operations office in Dharamshala, Himachal Pradesh and field offices. RBB owns and operates networks in the Indian states of Himachal Pradesh, Uttarakhand,[3] Jharkhand, Tamil Nadu and Karnataka. These networks, covering around 20,000 km², serve thousands of organizational, enterprise, non-profit, community-based and individual clients.
AirJaldi Research & Innovation, registered in India as a section 25 non-profit company, was created in 2007. I identifies suitable and affordable networking solutions for rural areas,[4] tests them in real-life environments and shares its learning with like-minded organizations and individuals. AirJaldi Research & Innovation also operates The AirJaldi Network Academy, a training and capacity-building center, where network operators and activists can acquire the skills to build and manage rural wireless networks.

copy: https://www.usenix.org/legacy/events/nsdi08/tech/full_papers/surana/surana_html/index.html

https://www.usenix.org/legacy/events/nsdi08/tech/full_papers/surana/surana_html/index.html

Beyond Pilots: Keeping Rural Wireless Networks Alive

Sonesh Surana1 ,
Rabin Patra1,
Sergiu Nedevschi1 ,
Manuel Ramos2,
Lakshminarayanan Subramanian3,
Yahel Ben-David4,
Eric Brewer1 5

Abstract

Very few computer systems that have been deployed in rural developing regions manage to stay operationally sustainable over the long term; most systems do not go beyond the pilot phase. The reasons for this failure vary: components fail often due to poor power quality, fault diagnosis is hard to achieve in the absence of local expertise and reliable connectivity for remote experts, and fault prediction is non-existent. Any solution addressing these issues must be extremely low-cost for rural viability. 

We take a broad systemic view of the problem, document the operational challenges in detail, and present low-cost and sustainable solutions for several aspects of the system including monitoring, power, backchannels, recovery mechanisms, and software. Our work in the last three years has led to the deployment and scaling of two rural wireless networks: (1) the Aravind telemedicine network in southern India supports video-conferencing for 3000 rural patients per month, and is targeting 500,000 patient examinations per year, and (2) the AirJaldi network in nothern India provides Internet access and VoIP services to 10,000 rural users.

1  Introduction

The penetration of computer systems in the rural developing world has been abysmally low. Several efforts around the world that have tried to deploy low-cost computers, kiosks and other types of systems have struggled to remain viable, and almost none are able to remain operational over the long haul. The reasons for these failures vary, but at the core is an under-appreciation of the many obstacles that limit the transition from a successful pilot to a truly sustainable system. In addition to financial obstacles, these include problems with power and equipment, environmental issues (e.g. heat, dust, lightning), and an ongoing need for trained local staff, as trained staff move on to better jobs. Researchers (ourselves included) tend to focus on the sexy parts of a deployment, such as higher performance or a highly visible pilot. However, real impact requires a sustained presence, and thus operational challenges must be viewed as a first-class research topic. Analogous to research on high availability, we must understand the actual causes of operational problems and take a broad systemic view to address these problems well.
In this paper, we describe our experiences over the last three years in deploying and maintaining two rural wireless systems based on point-to-point WiFi links. Our prior work on WiFi-based Long Distance Networks (WiLDNet) [26] developed a low-cost high-bandwidth long-distance solution, and it has since been deployed successfully in several developing regions. We present real-world validation of the links, but the primary contribution here is the exploration of the operational challenges of two rural networks: a telemedicine network at the Aravind Eye Hospital [3] in southern India and the AirJaldi [1] community network in northern India.
We have had to overcome major challenges in both networks: (1) components fail easily due to low quality power, (2) fault diagnosis is hard because of non-expert local staff and limited connectivity for remote experts, and (3) remoteness of node locations makes frequent maintenance difficult; thus fault anticipation becomes critical. All of these problems can be fixed by having higher operating budgets that can afford highly trained staff, stable power sources, and robust high-end equipment. But the real challenge is to find solutions that are sustainable and low-cost at all levels of the system. To this end, our main contributions are (1) documenting and categorizing the underlying causes of failure for the benefit of researchers undertaking rural deployments in the future, and (2) developing low-cost solutions for these failures.
In overcoming these challenges we have learned three important lessons that we argue apply to IT development projects more broadly. First, designers must build systems that reduce the need for highly trained staff. Second, simple redesign of standard components can go a long way in enabling maintenance at lower costs. And third, the real cost of power is not the grid cost, but is the cost of overcoming poor power quality problems. By applying these lessons to several aspects of our system including monitoring, power, backchannels, recovery mechanisms, and deployed software, we have made real progress in keeping these rural networks alive.
The Aravind network now uses WiLDNet to interconnect rural vision centers with their main hospitals for patient-doctor video-conferencing. Currently 9 vision centers cater to 3000 patients per month. Thus far, 30,000 rural patients have been examined and 3000 have had significant vision improvement. As all vision centers are now running with no operational assistance from our team, the hospital considers this network sustainable and is targeting a total of 50 centers in the next 2 years. Similarly, AirJaldi is also financially sustainable and currently provides Internet access and VoIP services to over 10,000 users in rural mountainous terrain.
In the next section we validate the sufficiency of real-world WiLD performance, and outline the challenges to operational sustainability. Section 3 provides some background for the Aravind and AirJaldi networks. In Section 4, we document many of our experiences with system failures, and then in Section 5 present the design of all levels of our system that address these issues. Related work is discussed in Section 6, and in Section 7 we summarize three important lessons for rural deployments.

2  Motivation

In this section, we confirm high-throughput performance of WiLDNet links in real-world deployments, and then outline the operational challenges that remain obstacles to sustained impact.

2.1  Real-World Link Performance

Existing work [16,26,29,33,34] on rural networking has focused on making WiFi-based long-distance point-to-point links feasible. The primary goal has been high performance, typically expressed as high throughput and low packet loss. In prior work, we have studied channel-induced and protocol-induced losses in long-distance settings [33], and have addressed these problems by creating WiLDNet: a TDMA-based MAC with adaptive loss-recovery mechanisms [26]. We have shown a 2-5 fold increase in TCP/UDP throughput (along with significantly reduced loss rates) in comparison to the best throughput achievable by the standard 802.11 MAC. We had shown these improvements on real medium-distance links and emulated long-distance links.
In this paper we confirm the emulated results with data from several real long-distance links in developing regions. Working with Ermanno Pietrosemoli of Fundación Escuela Latinoamericano de Redes (EsLaRed), we were able to achieve a total of 6 Mbps bidirectional TCP throughput (3 Mbps each way simultaneously) over a single-hop 382 km WiLDNet link between Pico Aguila and Platillon in Venezuela. To the best of our knowledge, this is currently the longest distance at which a stable high-throughput WiFi link has been achieved without active amplification or custom antenna design. Each site used a 2.4 GHz 30-dBi reflector grid antenna with 5.3° beam-width and a 400 mW Ubiquiti SR2 radio card with the Atheros AR5213 chipset. 
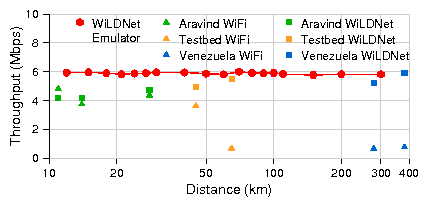
Figure 1 presents results from running WiLDNet on real links from our various deployments in Aravind (India), Venezuela, Ghana, and our local testbed in the Bay Area. We match the performance of WiLDNet over emulated links and greatly exceed the performance of the standard WiFi MAC protocol at long distances.
figures/tcp_bidir_all.png 

Figure 1: Comparison of TCP throughput for WiLDNet (squares) and standard WiFi MAC (triangles) from links in Aravind, Venezuela, Ghana (the 65 km link), and our local testbed in the Bay Area. Most urban links in Aravind had up to 5-10% loss, and so WiLDNet did not show substantial improvement over standard WiFi. However, WiLDNet's advantage increases with distance. Each measurement is for a TCP flow of 60s, 802.11b PHY, 11Mbps.

Thus we find that we are no longer limited by performance over long distances in rural networks. Instead, based on our experiences in deploying and maintaining networks in the two rural regions of India for the last three years, we argue that operational challenges are now the primary obstacle to successful deployments.

2.2  Challenges in Rural areas

Addressing these challenges requires looking at all levels of the system, starting from the power supply and base hardware, up through the software and user interface, all the way to training and remote management. Although remote management, reliable power and training of staff is hard in general, these problems are exacerbated in rural areas for several specific reasons [35]. First, local staff tend to start with limited knowledge about wireless networking and IT systems. This limits their diagnostic capabilities and results in inadvertent misuse and misconfiguration of equipment. Thus management tools need to help with diagnosis and must be educational in nature. The effectiveness of training is limited by the high turnover of IT staff, so education must be an ongoing process. 
Second, the chances of hardware failures are higher because of poor power quality and harsh environments (e.g. exposure to lightning, heat, humidity, or dust). Although we do not have conclusive data about the failure rate of equipment for power reasons in rural areas, we have lost far more routers and adapters for power reasons in rural India than we have lost in our Bay Area testbed. This calls for a solution that provides stable and high quality power to equipment in the field. Third, many locations with wireless nodes, especially relays, are quite remote, and therefore it is important to avoid unnecessary visits to remote locations. We need to enable preventive maintenance during scheduled visits. For example, evidence of a gradual degradation in signal strength at a remote router could indicate that a cable needs to be replaced or antennas need to be realigned in the course of a normal visit.
Fourth, the wireless deployment may often not be accessible remotely or through the Internet. The failure of a single link might make parts of the network unreachable, even if the nodes themselves are functional. This makes it very hard for remote experts or even local administrators to resolve or even diagnose the problem.

3  Background

Over the last three years we have deployed two rural wireless networks in India. One is at the Aravind Eye Hospital in south India where we link doctors at the centrally located Theni hospital to village clinics, known as vision centers, via point-to-point WiLD links. Patients video-conference over the links with the doctors for consultations. The other is in Dharamsala in north India and is called the AirJaldi network. This network is primarily a mesh with a few long distance directional links that provides VoIP and Internet access to local organizations. Both networks have faced largely similar operational challenges, but with some important differences.

3.1  The Aravind Network

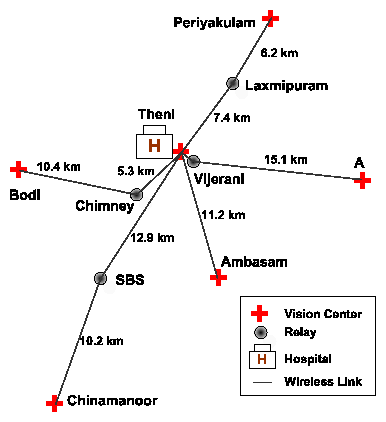
The Aravind network at Theni consists of five vision centers connected to the main hospital in Theni (Figure 2). The network has total of 11 wireless routers (6 endpoints, 5 relay nodes) and uses 9 point-to-point links. The links range from just 1 km (Theni - Vijerani) to 15 km (Vijerani - Andipatti). Six of the wireless nodes are installed on towers, heights of which range from 24-42 m; the others use short poles on rooftops or existing tall structures, such as the chimney of a power plant on the premises of a textile factory. Recently, Aravind has expanded this model to their hospitals in Madurai and Tirunelveli where they have added two vision centers. The network is currently financially viable and a further expansion to 50 clinics around 5 hospitals is being planned to provide 500,000 annual eye examinations.
Hardware: The wireless nodes are 266 MHz x86 single board computers. These routers have up to 3 Atheros 802.11 a/b/g radio cards (200-400 mW!!). The longer links use 24dBi directional antennas. The routers consume about 4.5W when idle and only 9.5W when transmitting at full bandwidth from 2 radios; 7 W is the average power consumption for a node. They run a stripped-down version of Linux 2.4.26 stored on a 512 MB CF card, and include our software for WiLDNet, monitoring, logging, and remote management.
The routers are placed in small and lightweight waterproof enclosures, and are mounted externally, close to the antennas, to minimize signal losses. They are powered via power-over-ethernet (PoE); a single ethernet cable from the ground to the router is sufficient. We use uninterruptible power supplies (UPS) to provide clean power, although we discuss solar power in Section 5.2.
figures/aravind.png
Figure 2: AravindTelemedicine Network. Theni hospital is connected to 5 vision centers. The other nodes are all relays.

Applications: The primary application is video-conferencing. We currently use software from Marratech [22]. Although most sessions are between doctors and patients, we also use the video conferencing for remote training of staff at vision centers. Typical throughput on the links ranges between 5-7 Mbps with channel loss less than 2%. But 256 Kbps in each direction is sufficient for very good quality video conferencing. Our network is thus over provisioned, and we also use the network to transmit 4-5 MB-sized retinal images. The hospital has a VSAT link to the Internet, but most applications require only intranet access within the network (except for remote management).

3.2  The AirJaldi Network

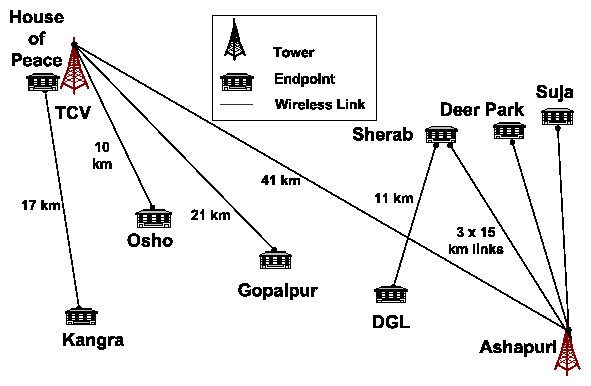
The AirJaldi network provides Internet access and VoIP telephony services to about 10,000 users within a radius of 70 km in rural mountainous terrain characterized by extreme weather. The network has 8 long distance directional links ranging from 10 km to 41 km with 10 endpoints (Figure 3). In addition, the network also has over a hundred low-cost modified consumer access points that use a wide variety of outdoor antennas. Three of the nodes are solar-powered relay stations at remote elevated places with climbable towers. All other antennas are installed on low-cost masts less than 5 m in height; the masts are typically water pipes on the rooftops of subscribers.
figures/airjaldi.png
Figure 3: AirJaldi Network. There are 8 long distance links with directional antennas with 10 endpoints.


Hardware: Most of the routers are modified consumer devices, either Linksys WRT54GL or units from Buffalo Technologies, and cost less than US$50. They are housed inside locally designed and built weatherproof enclosures, and are mounted externally to minimize signal losses. The antennas, power supplies and batteries are all manufactured locally in India. The router boards are built around a 200MHz MIPS processor with 16 MB of RAM, 4 MB of on-board flash memory, and a low power Broadcom 802.11b/g radio. We run OpenWRT on these routers, and use open source software for mesh routing, encryption, authentication, QoS, remote management and logging. For long distance links and remote relay stations we use slightly higher-end devices such as the PCEngines WRAP boards, MikroTik routerboards, and Ubiquiti LS2s, all with Atheros-based radios. 
Applications: The Internet uplink of AirJaldi consists of 5 ADSL lines ranging from 144 Kbps to 2 Mbps for a total of about 7 Mbps downlink and 1 Mbps uplink bandwidth. The longest link from TCV to Ashapuri (41 km) achieves a throughput of about 4-5 Mbps at 2-5% packet loss, while the link from TCV to Gopalpur (21 km) only gets about 500-700 Kbps at 10-15% loss due to the absence of clear line of sight.
This bandwidth is sufficient for applications such as Internet access and VoIP that cater primarily to the needs of the Tibetan community-in-exile surrounding Dharamsala, namely schools, hospitals, monasteries and other non-profit organizations. AirJaldi only provides connectivity to fixed installations and does not offer wireless access to roaming users or mobile devices. A cost-sharing model is used among all network subscribers to recover the operational costs. The network is currently financially sustainable and is growing rapidly.

4  Operational Experiences

We have experienced several operational challenges in both networks that have lead to significant downtimes, increased maintenance costs, and lower performance (e.g., increased packet loss). Initially we were involved in all aspects of network planning, configuration, deployment, and maintenance of the networks. Our specific end goal has been to ultimately transfer responsibility to our rural partners, primarily to ensure local buy-in and long-term operational sustainability. This process has not been easy. Our initial approach was to monitor these networks over the Internet and to provide some support for local management, sometimes administering the network directly (bypassing the local staff whenever required). But enabling remote management has been more challenging than expected because of severe connectivity problems (Section 5.3). This aspect, combined with the desire to enable local operational sustainability, has led us to design the system with more emphasis on support for local management, a particularly challenging problem given limited local experience. One way in which we have ensured that education remains an ongoing process is by creating a three-tier management hierarchy, in which local IT vendors (called integrators) with some expertise in networking were hired to form a mid-level of support between local staff and ourselves. With this tiered approach, the rural staff has gradually learned to handle many issues; the IT vendors still handle some, most notably installation, while our role has reduced from operational responsibility to just shipping equipment. In the last year we have not installed any links ourselves even though both networks have grown. We review this transition in our conclusion.
Although we were prepared to expect problems such as poor connectivity, power outages, and misunderstandings around proper usage equipment usage, the actual extent of these problems has been very surprising, requiring a significant custom design of the system at all levels to address these issues effectively. As a result, the reduced downtimes and lower maintenance costs have resulted in both networks being sustainable enough to pay for their own equipment and towers. Before moving on to the design of our system, we first document three major factors for operational outages; each factor is a result of a combination of the challenges presented in Section 2.2.

4.1  Components Are More Inclined to Fail

Operating conditions at Aravind and AirJaldi have greatly contributed to a substantial decrease in the robustness of system components that would otherwise work quite reliably. One major culprit has been the lack of stable and quality power. Although issues such as frequent power outages in rural areas are well known, we were surprised by the degree of power quality problems in rural villages even when power is available. Before addressing the power issues (Section 5.2), not a single day went by without failures related to low power quality in either network. Any effort that is focused on rural deployments must necessarily fix the power issues. Therefore we describe the quality of rural power in detail, particularly because it has not been previously documented.
figures/power-spikes.png
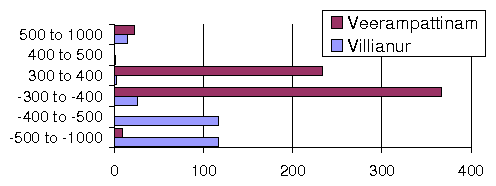
Figure 4: Histogram of power spikes from two rural villages. The bins (y axis) are the size range of the spike in volts, while the x axis is the count. Negative bins imply reversed polarity.

Low Power Quality: Figure 4 shows data on spikes from a power logger placed in two different rural villages in southern India for 6 weeks. We group the spikes based on their magnitude in volts; negative voltage means the polarity was reversed. We see many spikes above 500V, often with reversed polarity, and some even reaching 1000V! Clearly such spikes can damage equipment (burned power supplies), and has affected us greatly. We have also seen extended sags below 70V and swells above 350V (normal voltage in India is 220-240V). Although the off-the-shelf power supplies we use function well at a wide range of input voltages (80V-240V), they are not immune to such widely ranging fluctuations. Also, locations far away from transformers are subject to more frequent and extreme power fluctuations. Our first approach was to use UPS and battery backups. However, affordable UPS systems are only of the "standby" type where they let grid power flow through untouched; this passes the spikes and surges through to the equipment except during grid outages when the battery starts discharging and is expected to provide stable power.
Failures from Bad Power Quality: We have experienced a wide range of failures from bad power. First, spikes and surges have damaged our power supplies and router boards. In the AirJaldi network, we have lost at least 50 power supplies, about 30 ethernet ports and 5 boards to power surges, while in the Aravind network, we have lost 4 boards, at least 5 power supplies and some ethernet ports as well.
Second, voltage sags have caused brown outs. Low voltages leave routers in a wedged state, unable to boot completely. The on-board hardware watchdog, whose job is to reboot the router, is also often rendered useless because of the low voltages, thus leaving the router in a hung state indefinitely. Third, fluctuating voltages cause frequent reboots, which corrupt and occasionally damage the CF cards through writes during the reboots.
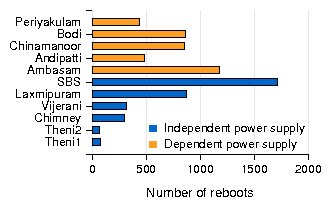
As a typical example, the router at SBS in Aravind rebooted at least 1700 times in a period of 12 months (Figure 5), roughly 5 times per day, going up to 10 times for some days. In contrast, another router at Aravind deployed on top of chimney of a power plant from where it derives reasonably stable power has shown uptimes for several months at a stretch. In practice, we have observed that routers with more frequent reboots are more likely to get their flash memory corrupted over time. We had at least 3 such cases at nodes co-located with the vision centers (Figure 5), which experienced more reboots since staff at these locations shut down and boot up the routers everyday. Finally, frequently fluctuating voltage also prevents optimal charging of the battery backup and halves its overall lifetime.
Lack of quality power increases not only downtime but also maintenance costs. Traveling to remote relay locations just to reboot the node or replace the flash memory is expensive and sometimes has taken us several days, especially in Dharamsala where the terrain is rough.
Other Power-related Problems: In Dharamsala, one of the stormiest locations in India, lightning strikes have often damaged our radios. We have learned the hard way that whenever we deployed a mix of omni and directional antennas, the radios connected to the omni antennas were much more likely to get damaged during lightning storms compared to the radios connected to directional antennas.
It turned out that omni-directional antennas attract lightning more as they are usually mounted on top of masts and have a sharper tip, while directional antennas are typically mounted below the maximum height of the mast. To mitigate this problem, we install omni antennas about 50 cm below the top of the mast. However, this creates dead zones behind the mast where the signal from the antenna is blocked. To reduce these dead zones, we sometimes use an arm to extend the omni antenna away from the mast. After lowering the omni antennas, we have not lost any radios during storms.
figures/reboots_graph.png
Figure 5: Number of reboots estimated per node in the Aravind network for about one year of operation. Nodes with power supplies dependent on the vision center are turned on or off everyday. Nodes with independent power supplies are typically relay nodes or hospital nodes.

4.2  Fault Diagnosis is Difficult

Accurate diagnosis of the problem can greatly reduce response time and thus downtime. The most common description of a fault by our rural partners is that the "link is down." There are a wide variety of reasons for network outages and it is not always easy to diagnose the root cause. The lack of appropriate tools for inexperienced staff, combined with unreliable connectivity which hinders detailed monitoring, prevents accurate diagnosis. For example, a remote host might be running properly, yet is unreachable when an intermediate wireless link goes down. The non-functional link makes it impossible to query the remote host for diagnosis. In fact, there have been many instances where rural staff have traveled to the remote site with great difficulty only to realize that it was a regular power shutdown from the grid (in which case nothing could be done anyway), or that it was a software problem which could have been fixed if there were an alternate backchannel to the router. Accurate diagnosis of such problems can save considerable time and effort, and prevent unnecessary travel. Furthermore, our own ability to help the local staff by logging in remotely to diagnose the problem is limited by connectivity. For instance, we use the VSAT link at Theni (in the Aravind network) to aid the local staff in monitoring and managing the network, but the VSAT backchannel has worked for only 65% of the time in the last one year.
Sometimes local misunderstandings of equipment usage make it even harder to diagnose problems. For example, as shown in Figure 6, an elevator shaft was constructed right in front of the directional antenna at Aravind Theni hospital, completely obstructing the line of sight to the remote end. Whenever we remotely logged in to the Theni end of the link from Berkeley, everything seemed fine except that we could not communicate with the remote end. We had no other network access to the remote host so local staff kept physically checking the remote end, but did not (ourselves included) think of checking the roof at Theni. The resulting downtime lasted for two months until we flew there and saw the problem!
Packet Loss due to Interference: In the AirJaldi network, a decrease in VoIP performance was reported for a particular link at very regular intervals. However without any additional information to diagnose the problem, no action could be taken and this behavior persisted for three months. Finally, after some detailed monitoring by us (and not the rural staff), we saw a regular pattern of packet loss between 8am to 9am every day except Sundays. But scanning the channels showed no external WiFi interference. We were finally able to attribute the problem to a poorly installed water pump that was acting like a powerful spark generator, interfering with wireless signals in the vicinity. Without packet loss information, both the rural staff and we would have had a lot of trouble solving this problem.
Signal Strength Decrease: In the Theni-Ambasam link in the Aravind network (Figure 2), we noticed a drop in signal strength of about 10 dB that persisted for about a month. Without further information it was hard to tell whether the antennas were misaligned, or the pigtail connectors were damaged, or the radio cards were no longer working well. In the end, several different attempts were made by local staff over multiple trips; the radio cards, the connectors and even the antennas were replaced, and the signal strength bumped back up without it being fully clear what finally helped!
Network Partition: We experienced network partitions many times, but for several different reasons. For example, at Aravind, staff misconfigured the routing and added static routes while dynamic routing was already enabled. This created a routing loop partitioning the network. In another instance of operator error, the default gateway of one of the routers was wrongly configured. There were also a few instances when operators changed the IP addresses of the endpoints of a link incorrectly, such that the link was non-functional even though it showed up as being associated. And as mentioned earlier, the construction of the elevator shaft left the network partitioned for two months.
figures/antenna_obstacle.png
Figure 6: The Theni to Vijerani link in the Aravind network was completely obstructed by a newly constructed elevator shaft. This problem was not resolved until we visited Theni after 2 months.
"Fixing" by users: A recurring problem is that well-meaning rural staff often attempt to fix problems locally when the actual root cause is not local. For example, at AirJaldi we have seen that when an upstream ISP goes down, rural staff tend to change local settings in the hope of fixing the problem. These attempts typically create new problems, such as misconfiguration, and in a few cases have even resulted in damage to equipment. In all these cases, the network remained non-functional (but now for a different reason) even after the ISP resumed normal connectivity. Thus we need mechanisms to indicate when a link is having problems at the remote end, so as to prevent local attempts at repair.
The general theme is that no matter what the fault, if the link appears to be down with no additional information or connectivity into the wireless node, it is hard for even experienced administrators to resolve the problem.

4.3  Anticipating Faults is Hard

Some of the node locations in our networks, especially relays, are quite remote. Site maintenance visits are expensive, time consuming, and require careful planning around the availability of staff, tools, and other spare equipment. Therefore, visits are generally scheduled well in advance, typically once every six months. In this scenario, it is especially important to be able to anticipate failures so that they can be addressed during the scheduled visits, or if a catastrophic failure is expected, then a convincing case can be made for an unscheduled visit for timely action. But without an appropriate monitoring and reporting system that includes backchannels, it is difficult to prepare for impending faults. Battery Uptime: At both Aravind and AirJaldi we use battery backups. Loss of grid power at the nodes causes their batteries to start discharging It is generally not known when the batteries will finally run out. If this information is somehow provided to the staff, they can prevent downtime of the link by taking corrective measures such as replacement of the the battery in time. Such feedback would also suggest if the problem were regional (as other routers would also suffer loss of grid power) or site-specific such as a circuit breaker trip.
Predicting Battery Lifetime: Battery life is limited by the number of deep cycle operations that are permitted. This lifetime degrades sharply because of fluctuating voltages seen in our deployments that do not charge the battery optimally, At Aravind, batteries rated with a lifetime of two years last for roughly three to six months. Information about remaining battery life can also enable prevention of catastrophic failures.
Predicting Disk Failure: We have observed that with frequent reboots over time, the disk partition used to store system logs accumulates bad ext2 blocks. Unless we run fsck periodically to recover the bad blocks, the partition becomes completely unusable very soon. We have also seen that many flash disks show hardware errors, and it is important to keep track of disk errors and replace them before they cause routers to completely fail.
Problem description System Aspects

Component Failures
Unreliable power supplyP
Bad power causing burnt boards and PoEsP
CF card corruption: disk full errorsM, P, S
Omni antennas damaged by lightning P
Fault Diagnosis
Packet loss from interferenceM
Decrease in signal strengthM
Network partitionsM, B
Self fixing by usersS
Routing misconfiguration by usersM, B, S
Failed remote upgrade B, R
Remote reboot after router crashB, R, S
Spyware, viruses eating bandwidthM, S
Anticipating Faults is hard
Finding battery uptime/status M, B, P
Predict CF disk replacementM

Table 1: List of some types of faults that we seen in both Aravind and AirJaldi. For each fault, we indicate which aspects of the system, as we have designed it, help mitigate the fault. The different aspects are Monitoring (M), Power (P), Backchannel (B), Independent Recovery Mechanisms (R) and Software (S).

The information on faults has been collated from logs and incident reports maintained by the local administrators and remote experts respectively.

5  System Architecture Design

In this section, we present five aspects of our system: monitoring, power, backchannels, independent recovery mechanisms, and software. Each has been designed to specifically address our goals of increasing component robustness, enabling fault diagnosis, and supporting fault prediction. For each aspect, wherever appropriate, we also discuss tradeoffs affecting our design choices. Table 1 indicates which aspects of our system design are important for reducing the impact of some of the common faults presented in the previous section.

5.1  Monitoring

All aspects of system management require some level of monitoring. During the initial deployment at Aravind, we faced two main challenges in designing a monitoring system. First, the Aravind network at Theni only allowed us to initiate connections from within the network. Second, local staff was not familiar with Linux or with configuration of standard monitoring software such as Nagios [10]. This led us to build a push-based monitoring mechanism that we call "PhoneHome" in which each wireless router pushes status updates upstream to our US-based server. We chose this method over the general pull-based architecture in which a daemon running on a local server polls all the routers. The pull-based approach would require constant maintenance via re-configuration of a local server every time a new router would be added to the network. In contrast, the push-based approach enabled us to configure the routers only once, at installation, by specifying the HTTP proxy to be used.
The Aravind network features two remote connectivity options, both of which are slow and unreliable (Section 5.3): (1) a direct CDMA network connection on a laptop at the central hospital node, and (2) a VSAT connection to another hospital, which has a DSL connection to the Internet. PhoneHome is installed on each of the wireless routers. All the routers periodically post various parameters to our US server website. Server-side daemons analyze this data and plot visual trends.
We collect node and link-level information and end-to-end measurements. The comprehensive list of the measured parameters is presented in Table 2. Most of these parameters can be measured passively, without interfering with normal network operation. However, several of these measurements, such as maximum link or path throughput, require active testing. Some of these tests can be performed periodically (e.g. pinging every network host), and some of them are done on demand (e.g. finding the throughput achievable on a particular link at a given time).
We also use the PhoneHome mechanism for remote management. Every time PhoneHome connects to our US server, it opens a reverse SSH tunnel back into the wireless node, enabling interactive SSH access to the Aravind machines. As the VSAT connection only allows access over an HTTP proxy, we are required to run SSH on top of HTTP, and configure PhoneHome with the proxy. In case of a direct connection to the Internet, no such configuration is required. Another option (employed in the remote management of AirJaldi) is to use the OpenVPN software to open VPN tunnels between network routers and remote servers.

Scope Type Measured Parameter
NodePassive CPU, disk and memory utilization, interrupts, voltage, temperature, reboot logs (number & cause), kernel messages, solar controller periodic data
Active disk sanity check
LinkPassive traffic:, traffic volume(#bytes, packets) wireless: signal strength, noise level, # control packets, # retransmissions, # dropped packets interference: # of stations overheard & packet count from each, # corrupted packets
Active liveness, packet loss, maximum link bandwidth
SystemPassive route changes, pairwise traffic volume & type
Active pairwise end-to-end delay & max throughput

Table 2: Parameters collected by PhoneHome.
PhoneHome proved to be helpful in understanding failures, diagnosing and predicting many faults. First, it helped maintain network reachability information, alerting the local staff when the network was down and action needed to be taken to recover. Earlier, only a phone call from a rural clinic could alert the local administrator, and depending on the awareness of the staff at the rural clinic, this call would not always happen.
Second, kernel logs transferred using PhoneHome helped us diagnose several interesting problems. For example, in certain instances routers configured with two network interfaces reported only one interface as being active. Pairing this information with power data, we realized that a low voltage supply can prevent two radio interfaces from functioning simultaneously. In another instance, kernel logs and system messages allowed us to examine flash disk error messages and predict when disk partitions needed repartitioning or replacement.
Third, by examining the posted routing table and interface parameters, we were able to diagnose routing misconfigurations or badly assigned IP addresses.
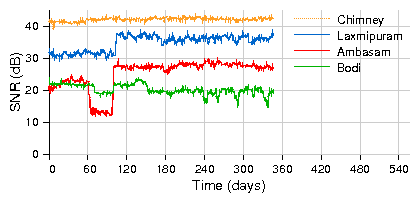
Fourth, continuous monitoring of wireless link parameters helped us narrow the scope of the problems in many cases. Figure 7 shows the signal strength variation in some of our network links. While majority of these links show fairly stable signal strength, some of them show important variation over time. For example, a sudden 10dB signal drop on the link between Ambasam to Theni indicated some kind of a drastic event such as a possible antenna misalignment that needed an immediate visit. On the other hand, a steady decline in signal strength on the Bodi link indicated a gradual degradation of a connector or the RF cable to the antenna that required an eventual visit.
figures/aravind.signal.png
Figure 7: Signal strength (shown in dB) variation for all links. 

Each point is average of measurement over 2 days. The Ambasam link shows a temporary drop in SNR of 10 dB for about 40 days. While the Bodi link is gradually degrading as its SNR has dropped by 4 dB over the last year, the Chimney link's SNR has remained constant.
Tradeoffs: We contrast this with monitoring at AirJaldi where we use various off-the-shelf tools such as Nagios [10] and SmokePing [13] to collect node, link, and network level parameters. Information is stored at a local data server in Dharamsala and then copied to a US server for detailed analysis. Various graphing toolkits such as MRTG [25] are used to visualize trends and detect anomalies.
The difference in approach compared to Aravind is in part due to the higher experience of the AirJaldi staff, and in part due to the better connectivity we have to AirJaldi. The advantage of having local servers polling for information is that they can be configured by local staff to look for relevant problems, but such an approach is beneficial only if local staff are experienced enough to take advantage of these features.
After three years of operation, the local Aravind staff (some of whom we lost due to turnover after they gained more experience through our training) are more familiar with system configuration, and show less apprehension in taking the initiative and maintaining the system on their own. Therefore, we are now beginning to use a pull-based model.
In general, we believe that during the initial phase of a network deployment, minimal configuration push-based mechanisms are more appropriate for data collection. However, after building enough local expertise, the monitoring system should be migrated towards a more flexible pull-based approach.

5.2  Power

Power quality and availability has been our biggest concern at both Aravind and AirJaldi. Low-quality power damages the networking equipment (boards and power adapters) and sometimes also batteries. Over 90% of the incidents we have experienced have been related to low power quality. Thus, designing to increase component reliability in the face of bad power is the most important task. We have developed two separate approaches to address the effects of low power quality. The first is a Low Voltage Disconnect (LVD) solution, which prevents both routers from getting wedged at low voltages and also over-discharge of batteries. The second is a low-cost power controller that supplies stable power to the equipment by combining input from solar panels, batteries, and even the grid. Low Voltage Disconnect (LVD): Over-discharge of batteries can reduce their lifetime significantly. Owing to the poor quality of grid power, all AirJaldi routers are on battery backup. LVD circuits, built into battery chargers, prevent over-discharge of batteries by disconnecting the load (router) when the battery voltage drops below a threshold. As a beneficial side-effect, they prevent the router from being powered by a low-voltage source, which may cause it to hang. Off-the-shelf LVDs oscillated frequently, bringing the load up and down, and eventually damaging the board and flash memory. Every week, there were roughly fifty reboot incidents per router due to hangs caused by low voltage. However, we designed a new LVD circuit [24] with no oscillation and better delay; since then the hangs per week per router have reduced to near zero in the Dharamsala network.
Power Controller: We have developed a microcontroller-based solar power charge controller [31] that provides a stable input of 18 V to the routers and intelligently manages the charging and discharging of the battery pack. It has several features such as maximum power point tracking, low voltage disconnect, trickle charging and very importantly, support for remote management via ethernet. The setup is trivial as it supplies power to the router using PoE. This combination is novel for its price of around $70.
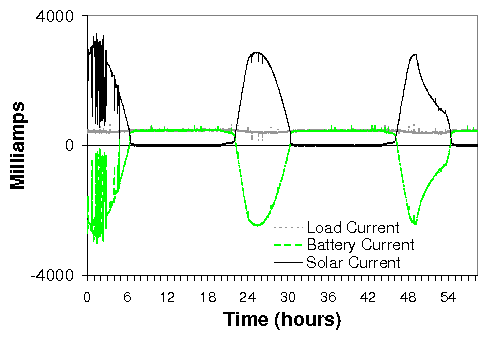
We use TVS diodes to absorb spikes and surges and a robust voltage regulator to get clean 18V power from wide ranging input conditions. Figure 8 shows the flow of current through the board over a 60-hour period. First, we note that power is always available to the router. When enough sunlight is available, the solar panel powers the router and charges the battery. During periods of no sun, the battery takes over powering the router. The frequent swings observed on the left part of the graph are typical for a cloudy day. The graphs also demonstrate how the battery is continually charged when sunlight is available. We have measured a 15% more efficient power draw from the panels, and also expect that we can double battery life. Using the controller, we have not lost any routers from bad power, but it has been only 8 months of testing.
The controller reports solar panel, load and battery status information that can be used for remote diagnosis and some prediction of battery uptime and lifetime. A second version of the controller, currently under development, will add the feature to take grid-supplied power as input. This has two major advantages: the same setup can be used to stabilize grid power locally, and grid power can also be used to charge the batteries in addition to the solar power.
Tradeoffs: The real cost of power in rural areas is not just the raw grid electricity costs, but the cost of overcoming power availability and quality issues through UPS, battery-backups, and and chargers. The recurring costs can be quite high, and therefore solar power, although still expensive, becomes more competitve than expected as it can produce clean power directly. Currently we choose to use solar for very remote locations. At less remote and critical sites, we tend to use "dumb" analog chargers to reduce costs even further.
figures/solar-trace.png
Figure 8: Current flow over 60 hours. The load stays even at 7W, while the solar panel and battery shift their relative generation over time. The battery current is negative when it is charging.

5.3  Backchannels

A wide variety of problems at Aravind and AirJaldi have caused link downtimes, leaving remote nodes disconnected. The failure of a single link makes part of the network unreachable although the nodes themselves might be functional. In many cases, if we had alternate access to the nodes, the fixes would have been simple such as correcting a router misconfiguration, or rebooting the router remotely. It is important to have out-of-band access or a backchannel to the nodes that is separate from the primary wireless path to it. Backchannel access is also useful in cases where the battery is discharging but the router is already down for other reasons. Information about the battery status from the charge controller via the backchannel would still be helpful. We have tried several approaches to backchannels in both networks.  

Network Backchannel: At the Aravind Theni hospital, we already had some form of backchannel into the Theni network through VSAT. We use PhoneHome to open an SSH tunnel over the VSAT link through an HTTP proxy at the Aravind Madurai hospital. We configure PhoneHome to post monitoring data to our US-based server every 3 hours and also to open a reverse SSH tunnel through which we can log back in for administration purposes. Out of the 2300 posts expected from the router at Theni over 143 days (2 posts every 3 days), we only received 1510 of them, or about 65%. So this particular backchannel was not very reliable in practice, sometimes not working for long stretches of time. As a result, we used the solitary hospital laptop to connect directly to the Internet using a 1xRTT CDMA card to improve the availability of a backchannel into the network. However, this laptop was used for several other purposes (shared hardware is a common feature in rural areas) and was mostly unavailable. Furthermore, in many instances the network backchannel was not enough as the local wireless network would itself be partitioned.
Node Backchannel: At AirJaldi, we built a node backchannel mechanism using GPRS. In India at the moment, GPRS connectivity costs roughly $10 per month for unlimited duration and bandwidth. We used a Netgear WGT634U router, interfaced through its USB 2.0 port with a mobile phone. The router runs PPP over GPRS and sets up an OpenVPN tunnel to a remote server. To enable remote diagnosis using this link, the backchannel router is connected to the main wireless router using ethernet and optional serial consoles. The backchannel router can also power-cycle the wireless router using a solid-state relay connected to one of its GPIO pins.
This approach has two advantages. First, the cellphone network is completely independent of the wireless link. Second, even though the mobile phone is charged from the same power source, it has its own battery which allows access via GPRS even if the main power source is down. However, for the Netgear router, we needed additional battery backup which adds to the maintenance complexity. One approach to simplify this setup for console access would be to use a Linux GPRS phone but we have not tried it yet.
Tradeoffs: Our experience with the GPRS backchannel in terms of providing real utility for system management has been mixed. Many common problems can be solved by alternative means in simpler ways. In cases of incorrect configuration of routers, we can imagine using the GPRS backchannel to fix problems. But at Aravind, when misconfigurations resulted in routing outages, we used cascaded hop-by-hop logins to move through the network, although this depended on at least the endpoint IP addresses to be set correctly. However, we can also use Link Local IP addressing [12] to have independent hop-by-hop backchannels. Each link gets a local automatic IP address from a pre-assigned subnet that would work even when the system wide routing does not work. This can also be implemented by using virtual interfaces in the Atheros wireless driver [15]. Such virtual link configuration approaches could be permanent and also independent of any network configuration
We have also used the built-in WiFi radio of the backchannel netgear router to remotely scan local air interfaces for interferences or low RF signals from other routers, particularly after storms in Dharamsala. But we found the most useful feature of the GPRS backchannel to be console access to the router in case of failed attempts at remote firmware upgrades. But arguably, good practices of testing the upgrade locally on an identical router may suffice. This would mean reducing the variety of router platforms used in the field to standardize testing. However, this can be hard to do practically, especially in initial phases as rural networks move from pilots to scale. In future work we intend to continue exploring the idea of cellphone backchannels.
One idea is that instead of using GPRS as the backchannel, a cheaper mechanism could be using SMS channels. With SMS, console access would need to be implemented from scratch. Instead of console access, one approach would be to just query the remote router over SMS. The reply would have power parameters (grid power, remaining battery, voltage level of power supply), and basic status information from the wireless board if it is up. The phone would be connected to the router within the enclosure over serial. This is often feasible because many places have more ready access to SMS compared to GPRS. For example, all our rural clinics at Aravind, have some degree of SMS coverage provided by 2-3 providers at least.

5.4  Independent Recovery Mechanisms

Failure-independent recovery mechanisms are essential for managing systems remotely. The best solution is to have fully redundant systems, but they are often too expensive. An intermediate solution, more viable for rural areas, is to have some independent modules that enable diagnosis and some recovery (but not full functionality and so cannot do complete failover). Alternate backchannels can enable independent access to various system components, and we include them in the design of independent recovery mechanisms. However in situations where the main router itself is wedged or is in a non-responsive state, we need components that can reset or reboot the main router for recovery. The components should not be affected by the failure themselves. In this section, we discuss software and hardware recovery.
Software watchdog: Essential software services can enter bad states and crash. For instance, we have seen wireless drivers have enter bad states that prevent the wireless card from receiving or transmitting packets even though the OS still keeps running. It is necessary to have a monitoring service that can either restart software services on the router or reboot the router itself.
We have built a software watchdog which is run by cron every 4 minutes. A configuration file lists what parameters to monitor such as IP reachability to a set of hosts, channel, SSID and BSSID changes, wireless operation mode as well as a list of processes that need to be running on the node. The configuration file also lists what actions to take upon failure of any of the tests, and how often a test is allowed to fail before an action is taken. Actions range from bringing the wireless interface down and up again, unloading and reloading kernel modules, to rebooting the node. We use this software watchdog in the AirJaldi network currently.
Hardware watchdog: An on-board hardware watchdog will reboot the router periodically unless it gets reset periodically after receiving keep-alive messages from the router. This is a vital feature, but most of the low-cost routers used at AirJaldi do not actually have on-board watchdogs. To address this we have designed for $0.25, a simple external hardware watchdog (a simple delay circuit) that interfaces with the board's GPIO line. We have designed this watchdog to plug into the router's power input port and to also accept PoE-enabled power so it can also power PoE-less routers, which allows us to use lower-cost routers as well. All the boards we use at Aravind have on-board watchdogs, but if the board is wedged due to lower voltage, then the watchdog itself will be rendered useless. However, we can avoid this by using the LVDs we have designed. In some cases, we are also using the power controller described in Section 5.2 as a form of external hardware watchdog; it monitors the board over ethernet and power-cycles it via PoE if it does not hear a keep-alive message in time.
Enabling Safe Fallback: As future work, we intend to use the backchannel and the independent recovery plane to implement safe fallback mechanism for upgrades. When upgrading the OS on a wireless router, we could use a software watchdog that will be configured to check that the upgrade does not violate any required properties. For example, the board should be able to initialize all the drivers, and ping local interfaces and remote nodes as well. If these are not satisfied, we should go back to a previously known fail-safe OS state. This can be combined with a hardware watchdog mechanism that can reboot the router to a fail-safe OS state in cases where the newly installed OS does not even boot.

5.5  Software Design

We have written substantial software for the WiLDNet MAC, monitoring, logging, remote management, fault diagnosis, and fault prediction. In this section we focus on aspects that we have not previously discussed: the boot loader, and configuration and status tools. Both play an important role in reducing failures. Read-only Operating System: We saw at the Aravind network that the CF cards used in the wireless routers would often get corrupted because of frequent and unexpected reboots. Writing even a single bit of data can corrupt a flash disk. We discovered at AirJaldi that if an oscillating LVD keeps rebooting a router, some write to the CF card during boot up will eventually fail and corrupt the flash. Unfortunately, since most boot loaders write to flash during the boot up process, we had to replace the boot loader with our own version that does not perform any writes at all.
In addition, it is better to mount the main OS partition read-only so that no write operations occur throughout the normal life cycle of the router. For log collection, we have an extra read-write partition on the CF card. However, in production systems, it would be preferable to have all the partitions to be read-only mounted.
Configuration and Status Tools: To train local staff in the administration of wireless network without exposing them to the details of underlying Linux configuration files, we designed a web-based GUI for easy configuration and display of simple status information about a particular router.
But to further aid local staff in diagnosing problems we need to build tools that can present an easy to understand view of the problem. For example, a simple mechanism at vision centers can indicate (via something as simple as LEDs) that the local wireless router is up and running, but that reachability to the remote router is down. This will minimize the tendency of self-fixing where local staff unnecessarily try to modify the local setup without realizing that the problem might be elsewhere.
Type of problem Instances Recovery time Who solved it Who solves it now

Circuit breaker trip at node locationsS:26 V:33 C:41 day Staff: Flip the breaker physically at location, added UPSStaff: Monitoring system triggers that node is down
PoE stopped working (transformer explosion) 1 1-7 daysIntegrators: Replaced PoE Staff: Replace PoE by checking connectivity and components
Loose ethernet cable jacksM:12 C:2 T:7 1-7 days Experts, Staff: Re-crimp RJ-45 with help from experts, train staff to check for loose cablesStaff: Monitoring system triggers that wireless link is up but ethernet is down
Routing misconfiguration: incorrect static routes, absent default gatewayRouting:2 Gateway:41-7 daysExperts: Using reverse SSH tunnel Integrators: Using config tool Staff/Integrators: Use config tool for routing
CF card corruption: disk full errorsReplace:2 Fix:10
Integrators, Staff: Replace CF card Experts: Run fsck regularly Automatic: Run fsck on problem Staff: Replace CF cards after config.
Wall erected in front of antenna: link went down1 2 months Experts: After physical verification Staff: Ensure line of sight
Ethernet port on board stopped working M:2 N/AIntegrators: Replace router board Staff/Integrators: Replace boards

Table 3: List of failures that have occurred since January 2005 at various locations in the Aravind network. For each fault, we list the downtimes, and who among staff, integrators, or remote experts used to solve the problem, and who solves it now. This information has been collated from logs and incident reports maintained by the local administrators and remote experts respectively. It is an underestimate as not all failures are accounted for in the local logs maintained by local staff.

6  Related Work

WiFi-based deployments: There have been several development projects that use WiFi-based network connectivity for applications such as healthcare (Ashwini [4]), the Digital Gangetic Plains [8]), e-literacy and vocational training (the Akshaya network [2]), education (CRCNet [7]) and so on. However, our deployment is possibly the first that takes a systematic approach towards sustainability and both projects are in active use by thousands of users. There are a number of community wireless projects in the US ([5,6,11]) that use a combination of open source monitoring tools, but they focus on a smaller range of operational challenges. Raman et al. in [30] try to summarize all the open issues in deploying rural wireless such as network planning, protocols, management, power and applications but they mainly focus on modifying the MAC and conserving power using Wake-on-LAN [23] techniques.
 Long distance point-to-point WiFi: Given the cost and performance promises of 802.11 rural connectivity, there have been several efforts to analyze the behavior [19,33] and improve the performance of multi-hop long-distance WiFi networks, including the design of an TDMA-based MAC layer [29] that relies on burst synchronization to avoid interference, and channel allocation policies to maximize network throughput [28]. Our work [26] builds and improves on these efforts, delivering a real-world implementation that delivers high-performance (5-7Mbps for links up to 382 Km), predictable behavior, and flexibility to accommodate various types of traffic. Raman et al.  [32] also investigate network planning solutions that minimize costs by optimizing across the space of possible network topologies, tower heights, antenna types and alignment and power assignments.

Long distance point-to-multipoint WiFi: It is not always possible to design a network with just point-to-point links. For example, in topologies where there is not much angular separation between clients with respect to a central location, it is infeasible to have separate point-to-point links to each client using directional antennas. Instead, an interesting compromise is to use sector antennas where some nodes run a point-to-multipoint (PMP) MAC protocol to provide access to a large number of clients that do not have very high individual throughput requirements while the long distance links still use the point-to-point MAC protocol [27,18]. We are currently in the process of extending the WiLDNet MAC protocol to support point-to-multipoint configurations as well.
Remote management: There has been a lot of work on remote operation and upgrades to large-scale datacenters [14,17] that have reliable power and network connectivity. There has also been work on online software upgrades to sensor networks [21]. However remote management solutions for wireless networks that located in remote rural regions has not received a lot of attention. In this spectrum, Meraki [9] provides a remote management suite for WiFi networks where all the monitoring, configuring, diagnosis and periodic updates for their field-deployed routers is hosted on the Meraki server.

7  Conclusion

We presented a wide range of operational challenges from three years of deployment experience with two different rural wireless networks. Although work to date largely focuses on performance, the primary obstacle to real impact for these networks is keeping them alive over the long term. Based on our experiences, we conclude by summarizing three broad lessons which we believe apply to other projects in developing regions. Prepare for absence of local expertise: Most projects assume that training will solve the need for local IT staff, but this is quite difficult. Although we have had some success with this at AirJaldi, it is limited due to high staff turnover. In some sense, better training leads to higher turnover. So instead, we have worked to reduce the need for highly trained staff on multiple levels.
Starting at the lowest layers, we have pushed hard on improving the quality of power and the ability of nodes to reboot themselves into a known good state. We have added substantial software for self validation, for data collection and monitoring. We also developed support for remote management, although it is limited by connectivity issues, especially during faults; in turn, we looked at backchannels to improve the reach for remote management. We also developed GUI tools that are much easier for local staff to use and that are intended to be educational in nature. At the highest level, the network integrators step in to handle issues that local staff cannot solve; earlier local staff would wait until we solved the problem, resulting in extended downtimes. This transition is shown in the partial list of failures in Table 3 from the Aravind network. For each fault we indicate how it was solved initially, what the associated downtime was, and also how that same fault is being solved now.
Redesign of components is oftens enough: As mentioned earlier in Section 4, because of harsh environmental conditions and unreliable power, commodity components fail more often in rural areas. One solution is to use expensive equipment such as military grade routers and big battery backups or diesel generators, as is done with cellular base stations at great cost. However, we aim to use low-cost commodity hardware for affordability.
In practice, even simple redesign of selected hardware components can significantly decrease the failure rates without adding much cost. In addition to getting WiFi to work for long distances, we also developed software and hardware changes for low-voltage disconnect, for cleaner power, and for more reliable automatic reboots, and we developed better techniques to avoid damage due to lightning and power surges.
The real cost of power is in cleaning it up: The key is to understand that the real cost of power in rural areas is not the cost of grid power supply, but of cleaning it using power controllers, batteries and solar-power backup solutions. Some development projects incorrectly view the cost of electricity as zero, since it is relatively common to steal electricity in rural India.6 However, the grid cost is irrelevant for IT projects, which generally need clean power (unlike lighting or heating). Due to short lifetimes of batteries and ineffective UPSs, power cleaning is a recurring cost. Solar power, although still expensive, is thus more competitive than expected as it produces clean power directly. We currently use solar power for relays or other locations where power is not available, and try to manage grid power elsewhere. At the same time, it is critical to improve the tolerance for bad power of all of the equipment, and to plan for sufficient back up power.
In the end, there remains much to do to make these networks easier to manage by the local staff; progress is required on all fronts. However, even the changes implemented so far have greatly reduced the number of failed components, have increased the ability of local staff to manage network problems, and have helped to grow the networks without significantly growing the staff. Both networks are not only helping thousands of real users, but are also experiencing real growth and increased impact over time.

Acknowledgments

We would like to thank the Aravind Eye Care System, the AirJaldi Community Network, Ermanno Pietrosemoli, and Alan Mainwaring for their help. We would also like to thank our shepherd, Robert Morris, for his contributions in improving the paper, and our reviewers, for their valuable feedback. This material is based upon work supported by the National Science Foundation under Grant No. 0326582.

References

[1]
AirJaldi Wireless Network. http://summit.airjaldi.com.
[2]
Akshaya E-Literacy Project. http://www.akshaya.net.
[3]
Aravind Eye Care System. http://www.aravind.org.
[4]
Ashwini: Association for Health Welfare in the Nilgiris. http://www.ashwini.org.
[5]
Bay Area Research Wireless Network. http://www.barwn.org.
[6]
Champaign-Urbana Community Wireless Network. http://www.cuwin.net.
[7]
CRCNet: Connecting Rural Communities Using WiFi. http://www.crc.net.nz.
[8]
Digital Gangetic Plains. http://www.iitk.ac.in/mladgp/.
[9]
Meraki Wireless Mesh Routers. http://www.meraki.net.
[10]
Nagios Wireless Monitoring. http://www.nagios.org.
[11]
NY Wireless Network. http://www.nycwireless.net.
[12]
RFC 3927: Dynamic Configuration of IPv4 Link-Local Addresses . http://www.ietf.org/rfc/rfc3927.txt.
[13]
SmokePing. http://oss.oetiker.ch/smokeping/.
[14]
S. Ajmani, B. Liskov, and L. Shrira. Scheduling and simulation: How to upgrade distributed systems. In HotOS-IX, 2003.
[15]
Atheros. MadWiFi driver for Atheros Chipsets. http://sourceforge.net/projects/madwifi/.
[16]
P. Bhagwat, B. Raman, and D. Sanghi. Turning 802.11 Inside-out. In Hotnets-III, 2004.
[17]
E. Brewer. Lessons from Giant-scale Services. IEEE Internet Computing, 2001.
[18]
K. Chebrolu and B. Raman. FRACTEL: A Fresh Perspective on (Rural) Mesh Networks. In ACM SIGCOMM Workshop on Networked Systems for Developing Regions (NSDR), August 2007.
[19]
K. Chebrolu, B. Raman, and S. Sen. Long-Distance 802.11b Links: Performance Measurements and Experience. In ACM MOBICOM, 2006.
[20]
M. Gregory. India Struggles with Power Theft. http://news.bbc.co.uk/2/hi/business/4802248.stm, 2006.
[21]
P. Levis, N. Patel, D. Culler, and S. Shenker. Trickle: A Self Regulating Algorithm for Code Propagation and Maintenance in Wireless Sensor Networks. In NSDI, 2004.
[22]
Marratech. Videoconferencing Software. http://www.marratech.com.
[23]
N. Mishra, K. Chebrolu, B. Raman, and A. Pathak. Wake-on-WLAN. In WWW, May 2006.
[24]
P. Narhi and Y. Ben-David. Air Jaldi Charger Hardware Design. http://drupal.airjaldi.com/system/files/ Jaldi_Charger_design_1.6.3.pdf.
[25]
T. Oetiker. MRTG: The Multi Router Traffic Grapher. http://oss.oetiker.ch/mrtg/.
[26]
R. Patra, S. Nedevschi, S. Surana, A. Sheth, L. Subramanian, and E. Brewer. WiLDNet: Design and Implementation of High Performance WiFi Based Long Distance Networks. In NSDI, 2007.
[27]
K. Paul, A. Varghese, S. Iyer, and B. R. A. Kumar. WiFiRe: Rural Area Broadband Access Using the WiFi PHY and a Multisector TDD MAC. New Directions in Networking Technologies in Emerging Economics, IEEE Communications Magazine, 2006.
[28]
B. Raman. Channel Allocation in 802.11-based Mesh Networks. In IEEE INFOCOM, April 2006.
[29]
B. Raman and K. Chebrolu. Design and Evaluation of a new MAC Protocol for Long-Distance 802.11 Mesh Networks. In ACM MOBICOM, August 2005.
[30]
B. Raman and K. Chebrolu. Experiences in using WiFi for Rural Internet in India. IEEE Communications Magazine, January 2007.
[31]
M. Ramos and E. Brewer. TIER Solar Controller.old: http://tier.cs.berkeley.edu/wiki/Power   
new: http://tier.cs.berkeley.edu/drupal/  
[32]
S. Sen and B. Raman. Long Distance Wireless Mesh Network Planning: Problem Formulation and Solution. In WWW, 2007.
[33]
A. Sheth, S. Nedevschi, R. Patra, S. Surana, L. Subramanian, and E. Brewer. Packet Loss Characterization in WiFi-based Long Distance Networks. In IEEE INFOCOM, 2007.
[34]
L. Subramanian, S. Surana, R. Patra, M. Ho, A. Sheth, and E. Brewer. Rethinking Wireless for the Developing World. In Hotnets-V, 2006.
[35]
S. Surana, R. Patra, and E. Brewer. Simplifying Fault Diagnosis in Locally Managed Rural WiFi Networks. In ACM SIGCOMM Workshop on Networked Systems for Developing Regions (NSDR), 2007.

Footnotes:

1University of California, Berkeley 2University of the Philippines 3New York University 4AirJaldi, Dharamsala, India 5Intel Research, Berkeley 6The tolerance of theft is a kind of subsidy for the poor, but it is badly targeted as others steal power too. India loses about 42% of its generated electricity to a combination of theft and transmission losses (vs. 5-10% in the US) [20].